6.S081环境配置及参考资料
参考资料
-
官方指导:https://pdos.csail.mit.edu/6.S081/2021/labs/guidance.html
-
中文文档:https://mit-public-courses-cn-translatio.gitbook.io/mit6-s081/
安装XV6
1 | apt-get update |
The latest xv6 source and text are available via
and
1 | cd xv6-riscv |

安装成功
指针预备知识
1 |
|
GDB 调试
-
打开两个终端窗口
-
在第一个窗口中输入
make qemu-gdb1
*** Now run 'gdb' in another window. qemu-system-riscv64 -machine virt -bios none -kernel kernel/kernel -m 128M -smp 3 -nographic -drive file=fs.img,if=none,format=raw,id=x0 -device virtio-blk-device,drive=x0,bus=virtio-mmio-bus.0 -S -gdb tcp::25500
-
在第二个窗口中,修改自己
home目录下的.gdbinit文件,允许gdb在xv6-riscv这个目录启动的时候,加载该文件夹下的.gdbinit文件。1
echo "add-auto-load-safe-path YOUR_PATH/xv6-riscv/.gdbinit " >> ~/.gdbinit
-
输入
gdb-multiarch1
2
3
4
5
6
7
8
9
10
11
12
13
14
15
16
17
18
19
20
21
22
23$ echo "add-auto-load-safe-path /home/ubuntu/xv6-riscv/.gdbinit " >> ~/.gdbinit
$ gdb-multiarch
GNU gdb (Ubuntu 9.2-0ubuntu1~20.04) 9.2
Copyright (C) 2020 Free Software Foundation, Inc.
License GPLv3+: GNU GPL version 3 or later <http://gnu.org/licenses/gpl.ht
ml>
This is free software: you are free to change and redistribute it.
There is NO WARRANTY, to the extent permitted by law.
Type "show copying" and "show warranty" for details.
This GDB was configured as "x86_64-linux-gnu".
Type "show configuration" for configuration details.
For bug reporting instructions, please see:
<http://www.gnu.org/software/gdb/bugs/>.
Find the GDB manual and other documentation resources online at:
<http://www.gnu.org/software/gdb/documentation/>.
For help, type "help".
Type "apropos word" to search for commands related to "word".
The target architecture is assumed to be riscv:rv64
warning: No executable has been specified and target does not support
determining executable automatically. Try using the "file" command.
0x0000000000001000 in ?? ()
(gdb)
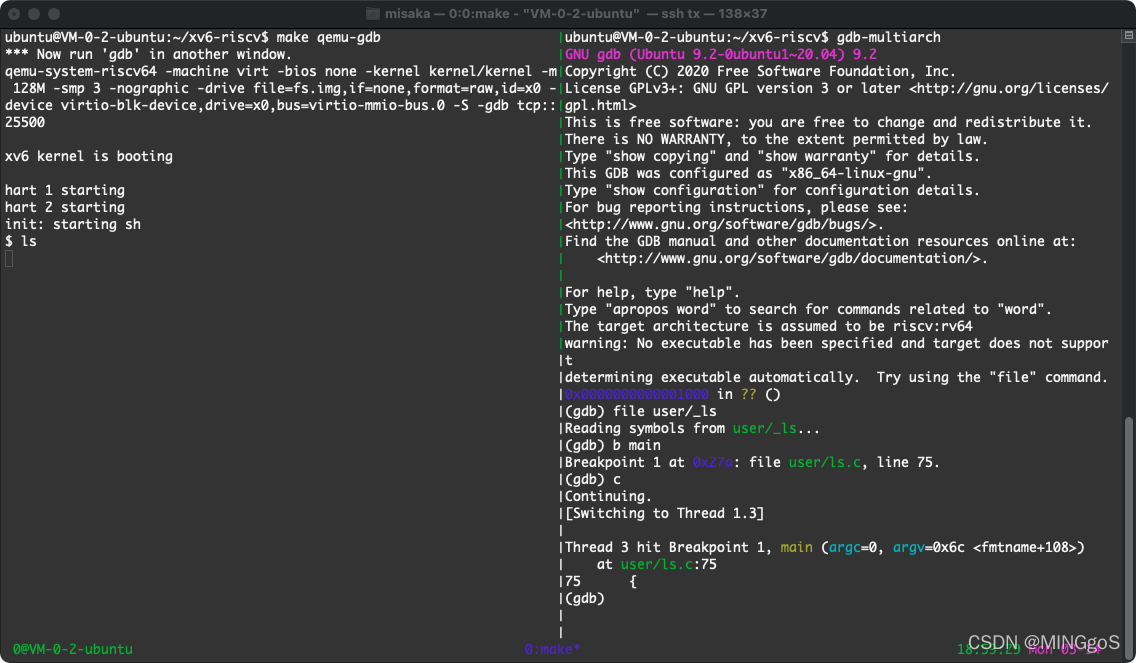
- 给代码打断点 简单来说,就是以下几步:
file user/_lsb mainc- 之后就是正常的
GDB使用流程了
FINALLY:
第二个窗口:
1 | (gdb) file user/_ls |
第一个窗口
1 | (......) |
- 之后我们就可以正常地通过
GDB调试程序啦~
VSCode 调试
比较推荐,功能更全。
首先在xv6-labs-2021目录下创建.vscode文件夹,在这个文件夹下新建launch.json、tasks.json,内容分别如下:
1 | // launch.json |
然后进行调试测试,我们可以找到 kernel/main.c 下的第13行,打一个断点,然后按F5。
错误1:如果出现 /Program path ‘xv6-labs-2021/kernel/kernel’ is missing or invalid 错误,先不用管,等待终端的gdb跑起来。
错误2:如果出现 Unexpected GDB output from command “-target-select remote 127.0.0.1:25000”. Remote communication error. Target disconnected.: Connection reset by peer. 错误,需要在xv6-labs-2021下找到.gdbinit文件,注释掉target remote这行:
1 | set confirm off |
注意1:如果make clean后再按F5(它会执行make qemu-gdb),.gdbinit这个文件会被刷新,所以我们又要去注释掉target remote那行,然后再按F5,目前我还没找到更好的解决方法。
注意2:由于xv6默认多核运行,所以调试代码的时候可能会有点混乱,可以通过修改tasks.json中command字段为make qemu-gdb CPUS=1,即单核运行。这仅供调试使用,因为正常情况下代码要通过多核的运行。
系统调用
| 系统调用 | 描述 |
|---|---|
| fork() | 创建进程 |
| exit() | 结束当前进程 |
| wait() | 等待子进程结束 |
| kill(pid) | 结束 pid 所指进程 |
| getpid() | 获得当前进程 pid |
| sleep(n) | 睡眠 n 秒 |
| exec(filename, *argv) | 加载并执行一个文件 |
| sbrk(n) | 为进程内存空间增加 n 字节 |
| open(filename, flags) | 打开文件,flags 指定读/写模式 |
| read(fd, buf, n) | 从文件中读 n 个字节到 buf |
| write(fd, buf, n) | 从 buf 中写 n 个字节到文件 |
| close(fd) | 关闭打开的 fd |
| dup(fd) | 复制 fd |
| pipe( p) | 创建管道, 并把读和写的 fd 返回到p |
| chdir(dirname) | 改变当前目录 |
| mkdir(dirname) | 创建新的目录 |
| mknod(name, major, minor) | 创建设备文件 |
| fstat(fd) | 返回文件信息 |
| link(f1, f2) | 给 f1 创建一个新名字(f2) |
| unlink(filename) | 删除文件 |